Thursday 13 February 2020

Heartfelt Creations DT Call - Triple layer step card.

Hello everyone, sharing my 3rd and final project created for the DT call. This is a triple layer step card using the Oakberry lane collection from Heartfelt Creations. I loved creating this project as it has lovely colors combined together beautifully.
The white card base measures 6 ½’’x18’’, scored at 4’’, 8’’, 11’’, 14’’, 16’’ and folded into mountain-valley folds. Cut mat layers for each side measuring ¼’’ smaller than the card base sides using designer paper. Distress the edges of each of the papers using a paper distress tool, shade with Peeled pain distress oxide ink and adhere to each of the sides. 
Create die-cut pieces from white card stock – 4 from Decorative pocket accents dies, 1 each of largest and smallest Rounded window frames die and 1 from the Sweetheart border die. Cut the second largest Rounded window frame using Gold metallic cardstock along with a circle die-cut mat layer using a designer paper. Shade all the die-cut pieces using Peeled paint oxide ink. Take the Sweetheart borders die-cut, cut into half and adhere on either edges of the last fold, gluing only 1/4th part. Similarly, adhere the 4 die-cut pieces from Decorative pocket accents half-way over the first and the second folds. Finally, take the Rounded window frames die-cuts along with the mat layer, stack them in order and adhere half-way over to the center of the last fold.
Die-cut the decorative piece from Album tags and accents using white cardstock and the mat layer using metallic gold card stock. Stamp a sentiment on the white die-cut piece using Versa-mark embossing ink and sprinkle some gold embossing powder and heat-set it. Shade the sentiment pieces with Peeled paint oxide ink, arrange both the layers and adhere it half-way over the Round window frames die-cut piece. Similarly take another sentiment from the designer paper and add a mat layer with white card stock, shade the edges using the green ink and adhere them on the front fold towards one side. Die-cut the medium sized tag from Ornamental tags set with two designer papers, shade them with the green ink and stamp a sentiment on one of the piece. Arrange these die-cuts with the stamped piece on top and adhere to the second fold of the card base towards one side.  
Stamp the large one-sided butterfly from the Fluttering Butterfly set with Versamark ink and heat emboss it with gold embossing powder. Color the butterfly using Squeezed lemonade distress ink, Shaded lilac distress ink, Cactus flower and Sunflower archival inks. Cut the image using the coordinating dies and adhere it to the front fold using dimensional foam tape. 
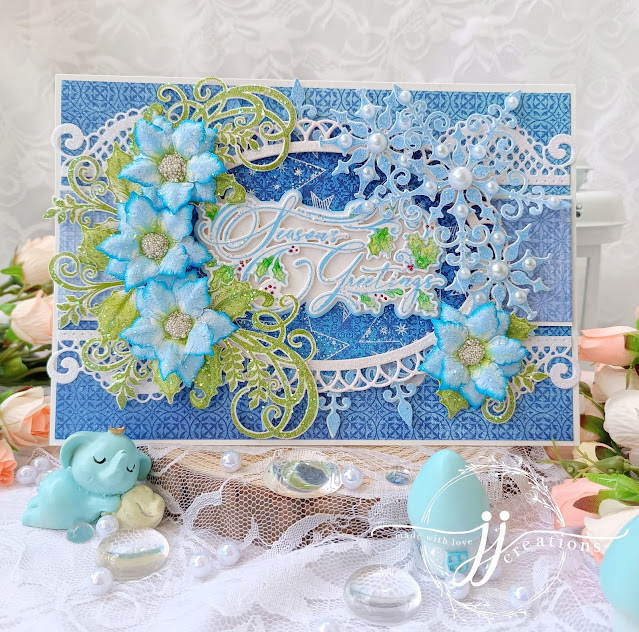
 For the flowers – stamp the flowers from Oakberry lane on floral paper using French ultramarine archival ink, color those with forget-me-not, Cactus flower archival inks and cut out them using the coordinating dies. To shape the flowers, dip them in a bowl of water, remove the excess water with a soft towel and emboss with the groove golf tools. Once dried, shade the flowers again with a layer of Aquamarine archival ink, stack and glue them with yellow wire pollen in the center. For the filler flowers, cut some flowers from the smallest of the Floral Fashionista dies on floral paper, shade few of them with Sunflower archival ink and the rest be left as white. Mist them with water and shape with groove golf tools and leave them for drying. Once dried add desired pollens and tie them into small floral sprays.
For the leaves – stamp some leaves from the Oakberry lane set with Fern green archival ink on floral paper, shade the edges using Buttercup archival ink and cut them out using the coordinating dies. Shape the leaves my misting water and embossing with groove tools.
Once the flowers and leaves are all set, arrange it accordingly on all the three folds of the card base and glue them. Sprinkle some Crystal clear powder on them using glue with wet sponge. Finish off the card by adding clear water droplets using yellow colored Nuvo drops randomly around the card base.

Supplies used : 
*White card stock – 250gsm.
*Heartfelt Creations Oakberry lane paper collection.
*Heartfelt Creations dies – Rounded window frames, Album tags and accents, 
                                                  Ornamental tags, Decorative pocket accents, Oakberry lane dies.
*Heartfelt Creations stamps – Oakberry lane stamps, Special Birthday sentiments stamp set.
*Dress My Craft – Nesting Circles die set, metallic golden card stock, 
 clear water droplets, yellow wire pollens, Soft floral oriental paper.
*Distress Inks – Squeezed Lemonade, Shaded Lilac, and Peeled paint oxide ink.
*Archival inks – Cactus flower, French ultramarine, Aquamarine 
*Versamark embossing ink.
*Ranger Superfine gold embossing powder.
*Nuvo drops – Dandelion yellow.
*Rajni Chawla’s crystal clear powder.

Heartfelt Creations DT Call project - Birthday Card

Hello all.. sharing my second project I created for the DT call.
Here I have created a card with vibrant colored flowers using the Blazing Poppy collection from Heartfelt Creations. 
The cream card base measurers 7’’x11’’ scored and folded into half to measure 5 ½’’x7’’. Create a mat base with designer paper which is ¼’’ less in size than the base, distress the edges with a paper distress tool and shade with Abandoned Coral oxide ink. Adhere the mat piece on front of the card.  
Create die-cut pieces from cream card stock – 2 die-cuts each using Starry night decorative dies and Intricate Swirl frames dies, 1 each from Decorative medallion and Elegant pocket accents dies along with a mat layer piece for each using designer papers. Shade the edges of each of these die-cut pieces and mat layers using abandoned coral oxide ink. Adhere the Elegant pocket accent die-cut along with its mat layer half-way across one of the short side of the card base. Adhere the Starry night decorative die-cuts on a circle die-cut mat layer to form a doily and attach it half-way across the other short edge of the card base. Adhere the Decorative medallion die-cut along with its mat layer half-way over the top-center of the card base.
 Stamp the sentiment from Special Birthday sentiments stamp set on a small oval die-cut piece using Abandoned coral oxide ink and heat emboss it with some clear embossing powder. Cut the 2 die-cut pieces of Intricate swirls die into half and adhere it behind the sentiment piece to form a decorative oval. Adhere this to the card over the Starry night die-cut piece using dimensional foam tapes.
Flowers – cut the flowers with floral paper using Blazing poppy dies. Dip these into a bowl of small amount of water mixed with few drops of Festive Berries distress re-inker and leave them to semi-dry. Shape the petals using groove golf tools and then leave them to dry completely. Once dried shade the edges and the groove marks of the petals using Abandoned coral distress ink. Crush the top center of each petal with fingers to give extra dimension and then stack them by adding green flower pollens in the center.
Leaves – stamp the leaves on floral paper using Leafy Accents stamp with Library Green archival ink. Shade the edges of the leaves using Vivid Chartreuse archival ink and cut them using the coordinating dies. To shape the leaves, mist them with water and emboss with groove golf tools and leave them for drying.

Arrange the flowers and leaves on the card base as desired and glue them. For extra shine, sprinkle some crystal clear powder and Snow white flower pearls on top by applying glue with a wet sponge. Finish off the card by adding some pearls and Nuvo drops randomly over the card base

Supplies used :
*Cream card stock – 250 gsm
*Heartfelt Creations Blazing Poppy paper collection.
*Heartfelt Creations stamps – Special Birthday sentiments, Leafy Accents.
*Heartfelt Creations dies – Starry nights decorative dies, Intricate Swirl Frames, Elegant                                                          Pocket accents, Decorative Medallion dies, Blazing Poppy dies.
*Distress ink – Festive berries re-inker, Abandoned coral, Abandoned coral oxide ink.
*Archival ink – Library green, Vivid Chartreuse.
*Dress My Craft - Nesting circles dies, yellow micro thread pollens, green round pollen, 
                                 Snow white flower pearls, Soft floral oriental paper.
*Spellbinders - basic oval dies.
*Nuvo Drops – Rosewater, Key lime.
*Rajni Chawla’s crystal clear powder

Heartfelt Creations DT CALL project - Layout.

Hello all... I'm so excited to share my new projects created for the 
DT Call from Heartfelt Creations. 
Here, I decided to create a layout which depicts a garden and so I used a picture of this beautiful garden as the focal point.
To begin with, I took a designer sheet from Winter’s Eve collection which matched the picture and distressed the edges with a pair of scissors. I simply tore two of the sides creating an opening, crumpled the edges by misting some water. Once dried I shaded the edges with Seedless Preserves Distress ink and finally applied Clear Gesso all over the layout and left for drying. I then tried to arrange the photo inside the layout as I wanted and marked it with pencil. Later I applied some Opaque modelling paste using a stencil randomly around the layout and poured some micro fine glitter for added shine. I also did some stenciling with white gesso in few other spots as well and left it for drying.
I took some die cut pieces from Decorative Medallion dies, tucked and glued behind the torn openings. Used some die cut pieces from Sweetheart border dies, shaded them with Seedless Preserves Distress oxide ink and glued on two of the sides of the layout. I also cut out a piece of designer paper from Oakberry lane collection along with some Fleur border die-cut piece and added as an accent piece on 1 side, took 2 other pieces from the same collection to cover behind the torn opening.
I matted the photo and another piece of designer paper with white cardstock which is 1/4th inch bigger in size, shaded the edges with Seedless Preserves distress oxide ink. I also added Sweetheart border die cut pieces on the designer paper piece on the longer edges, arranged and glued it using dimensional foam tape, along with the photo mat as I required. Added some chipboard pieces under either edges of the photo mat layer.
I took some flowers and leaves to arrange around the picture. For the flowers, I stamped the flowers from Sun Kissed Fleur collection using Pink Peony archival ink on white floral paper, shaded those using Vivid Chartreuse and Rose Madder archival inks and cut out with the coordinating dies. Later I shaped the flowers by dipping them in a bowl of water, removed the excess water with a soft towel and embossed with a groove golf tool. I stacked the flowers using green colored round pollen, used the small flowers and the leaves to create small flower spray.
For the leaves, I stamped the leaf stamps from Delightful daises collection using Library green archival ink on white floral paper, shaded those using Vivid Chartreuse archival ink and cut them out using the coordinating dies. I shaped the leaves by dipping in bowl of water, removed excess water with a soft towel and embossed using groove golf tool. Once all the flowers and leaves are dried, arranged and glued them around the photo layer. I also added Crystal clear powder on the flowers by applying glue with wet sponge.


I used two sentiment pieces from Oakberry lane collection matted the some die-cut pieces, shaded the edges using Seedless Preserves Distress oxide ink and glued on top and bottom corner of the layout. I finished off the project by adding some clear water droplets, sequins and flower pearls randomly around the layout. Hope you all liked my project.

Supplies used : 
*Heartfelt Creations designer papers : Winter’s Eve, Oakberry lane collection.
*Heartfelt Creations dies : Sweetheart Borders, Fleur Basics borders, Decorative Medallion,                                                   Ornamental tags, Sun Kissed fleur, and Delightful daisies.
*Heartfelt Creations stamps : Sun Kissed fleur, Delightful daisies.
*Archival inks : Pink Peony, Rose Madder, Library Green, Vivid Chartreuse.
*Distress inks : Seedless Preserves, Seedless Preserves oxide ink.
*Dress My Craft : Soft Floral Oriental paper, Micro fine glitter, Clear water droplets, 
                                 round styrofoam bud, purple flower pearls, Angel mix sequins.
*Stencils : Craftreat flourish background, Arabic pattern.
*Finnabair clear gesso, Expressions Craft white gesso, Art basics opaque modelling paste, *Expressions Craft Beaded swirls frame chipboard.
*Rajni Chawla’s crystal clear powder.

Heartfelt Creations DT - Snowflake Greetings

 Hello and welcome to another inspiration day... today I'm sharing another beautiful creation using the Star Holiday Collection from Hea...