Tuesday 8 February 2022

Love theme - Explosion Box

Hello again and welcome dear friends... this is the 3rd and final project I created for Heartfelt Creations DT Call'22.
I created this Explosion box with love theme, yet with a variant in the colors than the usual reds and pinks. The flowers are created using foamiran sheets this time as I wanted to create all 3 of my projects which differ each other in their form as well as the flower materials used.
Sharing the instructions below, to create this project along with the materials used.
Create a 4 by 4" explosion box on ivory card stock. Add pattern papers on each of the sides that are trimmed to 1/8" less than than the sides. Create a lid for the explosion box using the pattern paper itself and add coordinating lilac color satin ribbon along the sides of the lid. Cut 4 pieces each of the smallest of Rounded Window Frames die and the Intricate Swirl Frames die, sponge the edges using cactus flower ink and adhere them on each of the sides of the base. Cut 2 consecutive circles with ivory card stock, to the smaller circle - add green moss powder to create green grass effect and set it for drying. Once dried, layer this with the larger circle piece and adhere it to the inner center of the base. Assemble the chipboard pieces of couples, bridge and the lantern and adhere it on top of the green moss. 
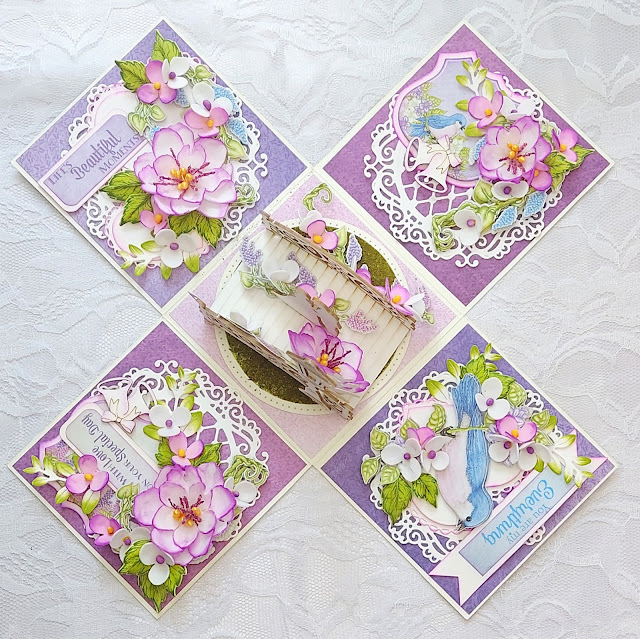
Cut several of the images of the birds, Wisteria vines, sentiments and tags from the pattern paper pack, distress each of them using cactus flower ink and stack 2 images each with dimensional foam tape. Cut 2 pieces each of medium sized plain heart and eyelet heart die cuts on ivory card stock, distress with cactus flower ink, stack them using dimensional foam tape and adhere on 2 of the opposite sides. Similarly on the other 2 sides, adhere the tag die cuts with dimensional foam tape.
For the lid, die cut 1 circle piece with the pattern paper and a slightly larger 
scallop piece on ivory card stock, distress them with cactus flower ink and adhere 
them stacking with dimensional foam tape. 
Die cut several of the medium and small sized Wild Rose flowers with white foam sheets, color the edges of each petal with cactus flower ink, heat them slightly by the help of hot iron box and shape them. Stack 2 large and 1 small petal for each flowers and add stamens in the center. Die cut several of the Wisteria flowers with pink and white foam sheets. Color the edges of the pink flowers using violet ink, shape all of these flowers and add pollens in the center. Stamp several images of the Oakberry Lane leaves on floral paper using olive green ink, color them using leaf green ink, cut using the coordinating dies and shape them.
Arrange all the elements along with the flowers, leaves and vines on each of the flaps adding a sentiment piece besides them. Similarly arrange the flowers, leaves and sentiment, glue them on the lid and the inner center as shown in picture.
Materials used :
Heartfelt Creations - Cascading Petals paper collection
Heartfelt Creations - Eyelet Hearts die set
Heartfelt Creations - Ornamental Tags die
Heartfelt Creations - Rounded Window frames die set
Heartfelt Creations - Intricate Swirl frames die set
Heartfelt Creations - Large Wild Rose stamp and die set
Heartfelt Creations - Small Wild Rose stamp and die set
Heartfelt Creations - Wisteria petals stamp and die set
Heartfelt Creations - Oakberry Lane stamp and die set
Heartfelt Creations - Rock candy Stamens
Nested Circle dies
Scallop Circle dies
Leaf and foliage dies
Couples and Bridge 3D chipboard
Lanterns Chipboard
Floral Oriental paper
Ivory card stock - 330gsm
Foamiran sheets - white, pink
Archival inks - Cactus flower, Violet, Olive Green, Leaf Green
Flower Pollens
Hot Glue, Dries clear glue
Dimensional Foam Tape
Heat Embossing Tool
Paper Trimmer, scissors
Die-cutting and Embossing Machine

Layout - Follow your dreams

Hello dear friends.. welcome again and here I'm sharing my 2nd project I submitted for Heartfelt Creations DT Call'22. I created this layout inspiring the message - '' Follow your heart" and I used a picture which coordinated with the message. I created a layout this time as it would differ with the card I created earlier and the flowers too differ with material,
 this time using paper flowers.
Sharing the instructions to create this layout below along with the materials used.
Hope you all love it.. 😊
The ready layout is 12x12 size pattern paper. Take 1" satin ribbon with coordinating blue color and adhere it half way horizontally across the pattern paper. Die cut 4 pieces with cream card stock using the largest of the Decorative Pocket Accents die, sponge the edges with periwinkle ink and adhere these along either side of the satin ribbon. Die cut 8 pieces with cream card stock using the small Swirly Accents Spray die, stack 2 each together and adhere them on each of the corners and trim off the excess.
Die cut the photo using a circle die, add another scallop circle frame die cut on cream card stock, sponge the edges with periwinkle ink and adhere it on the photo. Die cut 2 consecutive circles slightly larger in size than the photo, 
heat emboss one with Gold Tinsel embossing powder on the edges. 
Die cut 3 pieces of the smallest accent die from Intricate Swirl frames die on cream card stock, sponge the edges with Periwinkle ink, cut them in half and adhere each piece along the circumference of the largest circle die cut, to create a doily. Stack all these pieces together along with the photo frame on top using dimensional tapes and adhere it to the layout as shown in picture.
Stamp few of the medium and small size Festive Poinsettia flowers on Floral paper using Fern Green ink, cut them using coordinating dies and sponge the edges with Periwinkle and Cobalt ink. Wet the petals and shape them using flower shaping tools and leave them for drying. Stamp few of the small Oakberry lane flowers on floral paper using fern green ink. Color them using sunflower ink, 
cut them using coordinating dies and shape them to create filler flowers. 
Stamp several of the leaf from Wild Rose collection with fern green ink on floral paper, cut them using the coordinating dies, sponge the edges using  leaf green and cobalt ink and shape them. Stamp and die cut few of the Wild Aster spray on floral paper with fern green ink and color them using cobalt and fern green. Again, stamp some of the Holly Berry spray with Versamark on floral paper, heat emboss with Gold Tinsel embossing powder and die cut them using the coordinating die.
 Add pollens to the flower centers and Crystal Clear glitter for all the flowers, leaves and the aster spray. 
Arrange all these elements around one side of the photo frame and adhere them in 
place using hot glue, as shown in the picture. Die cut 2 pieces on cream cardstock with the Ornamental tag die, sponge the edges with periwinkle ink and add the sentiment on the lower center of the layout. 
Finish off the project by adding few clear water droplets and flat back pearls.
Materials used :
Heartfelt Creations - Cottage Garden paper collection
Heartfelt Creations - Swirly Accent Spray die
Heartfelt Creations - Ornamental Tags die
Heartfelt Creations - Small Festive Poinsettia stamp and die set
Heartfelt Creations - Large Festive Poinsettia stamp and die set
Heartfelt Creations - Large Wild Rose stamp and die set
Heartfelt Creations - Wild aster spray stamp and die set
Heartfelt Creations - Holly Berry Spray stamp and die set
Heartfelt Creations - Intricate Swirl frames die set
Heartfelt Creations - Decorative Pocket Accents die
Nested Circle dies
Pearl thread stamen dies
Scallop Circle Frame dies
Floral Oriental paper
Cream card stock - 330gsm
Archival inks - Periwinkle, Fern green, Leaf Green, Cobalt
Versamark embossing ink
Ranger - Gold Tinsel embossing powder
Flower Pollens
Clear Water Droplets
Cream flat back pearls
Rajni Chawla's Crystal Clear powder
Hot Glue, Dries clear glue
Dimensional Foam Tape
Heat Embossing Tool
Die-cutting and Embossing Machine

Birthday easel card.

Hello fellow crafters, sharing the recent  project I created for Heartfelt Creations DT Call'22.
This is my 3rd time applying for the DT call and I hope my creating are up to the mark. 
Here I have created a birthday card with simple yet elegant look with an easel card base and  vellum flowers. 
I love arranging and layering a variety of die-cuts that can give and elegant look by itself - and that is how I created this card with flowers to accent the beauty.
The instructions for making this card is given below along with the materials used.
The ready top fold card base measures 6" by 7 1/2". To prepare the base, take one piece each of 6" by 7 1/2" and 6" by 8" card base on Ivory card stock. Score the second base at 1/2" at the long side, to make a hinge and adhere both the base along the hinge. Score the top card base at 3 1/2" along the long side and fold it to form an easel front.
Die cut 1 piece each of ivory and gold card stock using the largest of Sweetheart border die, stack and adhere them together with the gold piece under the ivory slightly off setting. Adhere this on the top fold of the front panel. Die cut 4 each of Ivory and gold pieces using the corner die from Swirly Accent Spray die set, stack and adhere them slightly off setting on the 4 corners of the bottom half of the front panel.
Die cut 2 ivory and 1 gold piece from the large frame of Elegant Swirl Gateway die set, stack them together using dimensional tape and adhere on the bottom half of the front panel. Die cut 1 piece each of ivory and gold using the largest of the Ornate Ovals die set. Stack them off setting and adhere on the center of the Swirl Gateway die cut using dimensional tape. Die cut 1 gold piece with the scallop accent die from the Album tags die set, die cut 1 ivory piece with the inner accent die; stamp a sentiment on the ivory die cut piece, stack it on top of the gold piece and adhere them on the center of  the oval die cuts.
On the inner card base, adhere 4 gold die cut pieces on each of the corner using the corner die from Swirly Accent Spray die set. Using the sentiment die from the Ornamental tags die set, cut pieces of ivory and gold, stack them together with gold sentiment piece on top and adhere them to the bottom part with dimensional tape.
 This would make the front card panel to stand as an easel.
Stamp few flowers from the medium and small size Petunia flower stamp, using white ink on vellum and white heat emboss them. Color them using leaf green in the center and coral color on the edges on both sides and cut them using the coordinating dies. Shape them using flower shaping tools and stack 2 petals each to form a flower. Add gold micro pearls for the flower centers. Sponge some glue on each of the flower petals and add Crystal Clear glitter. Stamp few leaf stems using fern green ink on white floral paper, with the Leafy Accents stamp; color the tip of the leaves with fern green ink and cut them using the coordinating die. Shape the leaves using the shaping mold and let them to dry. Arrange the flowers and leaves on the card front  and bottom panel as shown in the picture, using hot glue.

Materials used:
Ivory card stock - 330gsm
Gold Mirror card stock
Vellum card stock - 180gsm
Floral Oriental paper
Heartfelt Creations - Sweetheart Border die
Heartfelt Creations - Elegant Swirl Gateway die
Heartfelt Creations - Swirly Accent Spray die
Heartfelt Creations - Ornamental Tags die
Heartfelt Creations - Ornate Ovals die
Heartfelt Creations - Album Tags and Accent die
Heartfelt Creations - Small Classic Petunia stamp and die
Heartfelt Creations - Large Classic Petunia stamp and die
Heartfelt Creations - Leafy Accent stamp and die
Heartfelt Creations - 3D Leafy Accents shaping mold
Heartfelt Creations - Special Birthday Sentiments cling stamp set
Archival inks - Coastal Coral, Fern Green, Leaf Green
White Pigment ink
Ranger - White Superfine embossing powder
Gold Micro Flower pearls
Dimensional Foam Tape
Rajni Chawla's Crystal Clear powder
Hot Glue, Dries clear glue
Heat Embossing Tool
Die-cutting and Embossing Machine

Heartfelt Creations DT - Snowflake Greetings

 Hello and welcome to another inspiration day... today I'm sharing another beautiful creation using the Star Holiday Collection from Hea...