Monday 6 September 2021

Mixed media layout - Wedding gift.

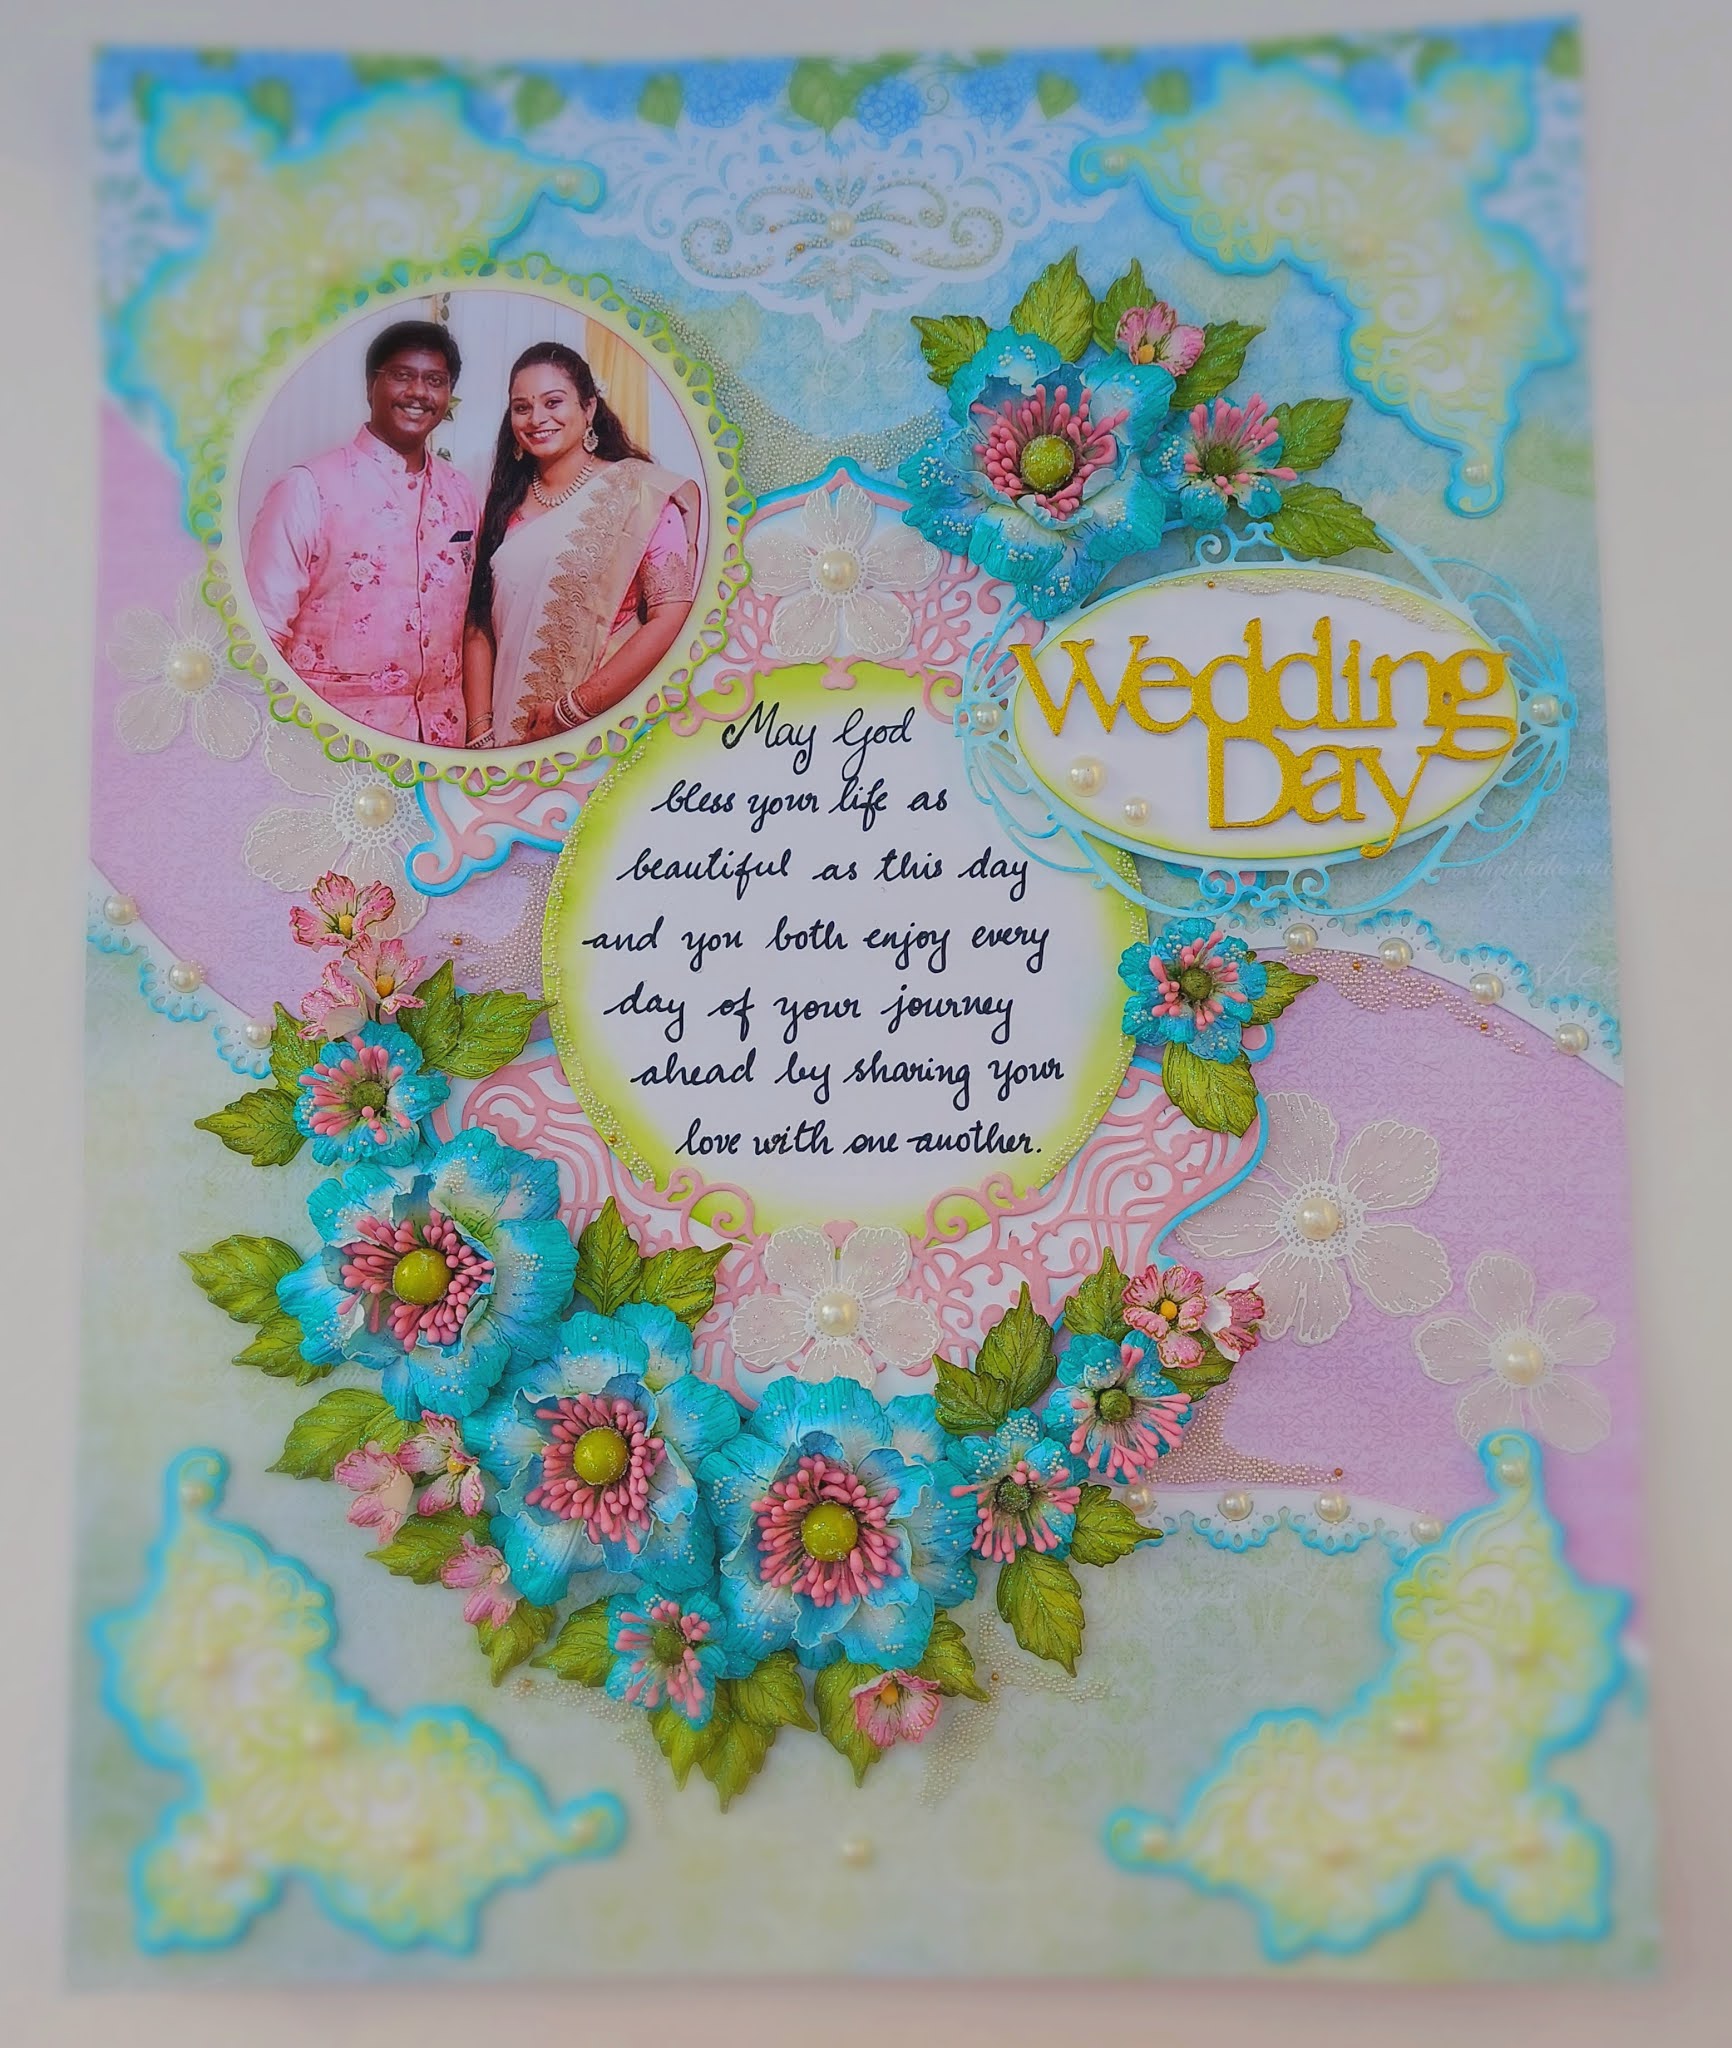
 Hello everyone.. today Im sharing another mixed media layout, I created as a Wedding gift.


The base is 12x12 pattern paper from DressMyCraft Dream Door collection. I prepped my base with a primer - clear gesso and planned on using several die-cuts for the background as added texture.
All the die-cuts I used are stacked with 2 or 3 die-cuts glued together, this gives depth for the designs.

I created flowers using the small Petunia flowers, white heat embossed and colored with Coral Coastal and Prickly Pear archival inks. Created some leaves also white heat-embossed and colored using Prickly Pear and Leaf Green archival inks.
All the die-cuts used on the layout are sponged with Aquamarine and Coastal Coral archival inks which coordinated the flowers and the background pattern paper. Arranged all the die-cuts along with the photo and the sentiment elements, including the flowers, fillers and leaves. Once I was happy with the arrangement, adhered all the elements to the base. Completed the project by adding enamel dots using Nuvo drops in the shade Bubblegum Blush.
The completed layout was then framed before gifting it, loved the layout and flowers and the final frame. I hope you all loved the project. Hoping to come up with new projects soon... 😊

Monday 9 August 2021

Round easel birthday card.

Hello everyone.. sharing another project, I created for my brother on his birthday.

This is a round easel card measuring 5x5" in size.

The cream card base is of 330gsm folded and cut into 5x5" circle with a small hinge on the fold. The pattern papers used to cover the card base is from the Cascading Petals paper pack from Heartfelt Creations. 

I used several of the die-cut with cream and gold cardstock using Heartfelt Creations dies - Decorative circle frame dies, Lacy diamond dies and Swirly accent spray die; aligned each die-cut with alternate cream and gold pieces using foam tape to give dimension. 

I created flowers using the small Petunia flowers stamp and die set from Heartfelt creations. Stamped with Fern green archival, colored with Sunflower and Rose Madder archival inks. The filler flowers are created using the smallest of the Floral Fashionista flower dies and colored them with Manganese Blue archival ink. 
I have also some foliage die-cuts from DressMyCraft and colored the tips using Fern Green archival ink.
I arranged the flowers and leaves on the top and bottom panel of the card base along with the die-cut arrangement. For the bottom panel, I added the sentiment die-cut of 'Gift For You' from Heartfelt Creations. I used the Intricate Butterfly stamp and die set for the gold heat-embossed butterfly and colored with Rose Madder archival ink.


Finally added white flat back pearls randomly over the flower arrangement and also over the butterfly. I loved the final outcome of this project, through all the hard work.

Wednesday 28 July 2021

Thinking of You - Slime-line card.

Hello and welcome you all... Slime-line cards have been a common trend at present and 

I would like to share my version of the same.

The card base is 4x9" in size with white cardstock. I used two matt layers varying in size with 3/4th of an inch, sponged one layer with Prickly Pear archival ink. The second layer, I sponged using Thistle archival ink.

I used some die-cuts using some white cardstock and pattern paper, layered on top of each other using foam tapes, for dimension. The die-cuts are using Spellbinders - 'Bed of Lace' and 'Brilliant Rondelle' dies set.
For the flowers, I used the Clematis flowers stamp and die set from Heartfelt Creations, stamped and colored using Thistle archival ink. I have also used some complementary colored filler flowers along with few die-cuts using the Wild Aster spray collection. 
All the elements were arranged on top and bottom of the center element.
For the center element, I used a stamp from 'Just for You' stamp set from Heartfelt Creations.

Monday 31 May 2021

Handmade cards - Heartfelt Creations dies

Hello everyone...

Here I'm sharing few of my cards I created for the month of May... All these cards are created using various Heartfelt Creations dies.

This card measures 6x6" in size, with using the Courtyard Elegance die-cut as the background. I have used the Wild Asters flowers for decoration along with some Wisteria flowers as the fillers.                            

I have used the sentiment as the focal point which hangs half way out from the card base. I have used contrast colors for the flowers with the background mat layer along with gold accents.         

The second card here also have the Courtyard Elegance die-cut in gold, but as the focal point with shaker element. This card measures 8x6.5" in size. I used a red color card base to match the pattern paper used for the mat layer.

I have used the Wild Aster flowers for this card as well but with the coordinating color to the card base. I have used contrast colored filler flowers as well using the Wisteria flower dies.

For the sentiment I used multiple die-cuts of the word die "Celebrate" and stacked them together on a banner die-cut. I wanted the sentiment to look subtle so as to tone down with the busy shaker element and flower arrangement.

      
The third card here measures 8x6" in size with pastel pink card base. 
I used Sweetheart border die-cuts for the top and bottom.
The center element is a die-cut from the Elegant Swirl gateways dies adding a touch of gold with a lattice die-cut piece. I used some bright colored flowers using the Oakberry Lane flower dies along with few filler flowers with contrast colors.
For the sentiment I used a simple die-cut and adhered it on one side of the center element.
Added some clear water droplets with the color matching the flowers.

The final card here is again using Off-white card base measuring 8.5x6.5" in size.

I used various die-cuts here to form the central focal element along with a sentiment.
 Each of the die-cut layers are stacked on top of the other with foam tape to give dimension to the focal element.
The flowers I used here, are from the Wild Rose dies with a little bright tone to give a contrast to the grey background layer. 
I also added few flat back pearls to accentuate the look of the card.
I loved making these cards and the end result is pretty awesome. 
Hoping to come up with many more beautiful projects in the coming month.
Please do follow my page  for more inspirations and give-in your valuable comments.
Keep safe and healthy... Thankyou !!!

Tuesday 11 May 2021

Wall decor - Wedding gift.

Hello all... welcome again with yet another set of projects, I created as wall decors.
I have been working on gifts lately as it was the Wedding season, 
and these 2 projects are also for the same - this time being one of my cousin's wedding. 
Though the project I made below includes family photos.
The base is 12x12" size chipboard sheet, were-in I have glued a pattern paper on top. Did some stenciling with texture paste and added a light wash of contrast color over them, letting them to dry before the next steps. 
I took few die-cuts to layer as mats for the pictures as well as the message, along with some lace die-cuts to glue on the base.
I created some flowers and leaves using the DressMyCraft dies - colored, shaped and stacked them to form beautiful daisy flowers. Arranged them on the places I wanted and glued everything securely. 
The final step I did was adding some purple sequins and pearl white beads randomly around the project.


The second project here is the actual wedding gift with the picture of the couples. The base again measures 12x12" in size, with a blue shaded pattern paper to give contrast to the rose flowers I planned to make.
I began with priming the base with clear gesso and then did some stenciling using texture paste, 
added a light wash of pink color to them and left it for drying.
Next I took few die-cuts using blue glitter cardstock and used them as mat layers for the picture and the hand-written message; added on the background with bee hive die-cuts for added texture. Used the same color cardstock to die-cut the 'Congratulations' as well. For the bottom corners I used a pair of chipboard designs along with some clay embellishments to go on the top.
Next comes the flowers - created Vellum flowers using the Classic Rose dies from Heartfelt Creations giving them a light pink color as planned. Made some leaves too to go on with the flowers and glued them with an apt arrangement. I also added some filler flowers with contrast colors from my stash, to make the rose flowers stand out. 
I used some green color sequins this time along with some blue pearls as added accents - to complete the project.
These were the most loved gifts my cousin received on his wedding day and I'm glad I made them all happy.. 😀
Please do follow my page and share in your comments, I would love to hear from you all.. Thankyou !!

Sunday 25 April 2021

Mixed media layout - Wall decor

Hello everyone.. today I'm sharing another project I created as a Wedding gift. 
The base chipboard sheet I used here is 12x12" in size, with a pattern paper from the DressMyCraft - Romantic Rose collection.
I began with priming the base after adhering the pattern paper to the chipboard base. Then applied some texture paste with stencil on the places I wanted. Once this was dried, I used some Orange and Aqua Blue color over the texture paste, by spritzing water along to give that shabby chic effect. These colors also contrasted with the pictures of the couples I was using on the project.
I wanted some kind of geometric shapes to be used here as the focal elements, so I chose hexagon shape. The pictures and the hand-written message was on hexagon shaped cardstock base and used contrast colors heat embossed frame to cover them. 
The sentiment piece was stamped  in black on a die-cut element and heat embossed with clear embossing powder. 
All these elements were arranged and glued on the base.
I created some foamiran flowers using the flower making dies from DressMyCraft along with some filler flowers on vellum. All the colors I used here contrasts each other and enhanced the beauty of the project. The flowers and leaves were arranged along one of the bottom corner of the message as well as below the sentiment. 
I also used some clay embellishments and some fussy cut elements from the Romantic Rose motif sheets.
Finally I added a mix of white with gold micro beads in and around the flowers are other elements, along with some heart shaped clear water droplets, colored with Emerald Green paint. I loved this project so much as each and every single element with its variation of colors added so much beauty the entire layout.
I wish to bring up many more lovely projects, please do follow my page, like and do share your comments. Thankyou !!! 

Sunday 18 April 2021

Wall decor frame - Wedding gift

Hello everyone.. hope you all are keeping safe and healthy. 
Today I'm sharing a wall decor frame I created as a wedding gift for one of my dearest friend. 
My plan was to keep a picture of the Bride and Groom along with the message. My mother kept asking me to make blue colored flowers for the gift and luckily, the picture I got was apt for using blue as a contrast color.. 😀
The cardboard base I used was cut to 9x12" in size and used few pattern papers from Heartfelt Creations paper pack that matched the color palette, I planned on creating with.
I then made a die-cut base for the message and the 'Wedding Day' sentiment along with a die-cut layer for the picture. I used few more decorative die-cuts along with its cover and played along with the arrangement for the desired look. Thankfully the die-cuts I used were from different brands, they coordinated very well with each other.
I created blue flowers with the Wild Rose flower stamp and dies set from Heartfelt creations along with some pink color filler flowers. Arranged all of them in a formation I liked and glued them on the base. I also used some white heat-embossed vellum flowers from the same Wild Rose collection and used them as accents for few areas I wanted. 
Finally used some white flat back pearls and a mix of gold and white microbeads and glued them randomly around the project. I loved the end result and it was my mother who loved it the most. I hope you all liked it too.. hoping to share more projects soon. 
 

Friday 2 April 2021

Mixed media layout - Wedding gift

Hello everyone.. today I'm sharing another beautiful project, I created for a wedding gift.
This is a 9x12" chipboard base, which I did glass framing after completing the whole project.
I chose a pattern paper for the base, which coordinated well with pinks and purples, as I planned to keep the similar color combination for the whole project. To begin with, I prepped the base with clear gesso after adhering the pattern paper. Once this dried, I applied some modelling paste with few stencils over the base randomly and kept it for drying. 
The modelling paste was mixed with some Seedless Preserves distress ink, for that purple color.
I made some embellishments using air-dry clay using molds of angels and some corner designs - colored them with light purple paint and glued them on the base as I wanted. Along with this, I adhered a hand written message and 'Congratulations' word sentiment die-cut on the center. The decorative die-cuts were cut on gold glitter cardstock using some Heartfelt Creations dies. 
I created some flowers and leaves using the Wild Rose stamp and dies from Heartfelt creations, with the colors that matched beautifully with my planned color palette. I also did some dry brushing with Nuvo gold mousse on all the clay embellishments, to give them a gold tinge. Finally I used some white flat back pearls and a mix of white with gold microbeads, in and around the arrangements. I completed the project with 2 nice coats of spray varnish giving enough time to dry in between each coat.
I hope you all loved this project, and do follow my page for more inspirations.. thankyou  😊


Wednesday 24 March 2021

Birthday cards - Foamiran flowers

Hello everyone, welcome to yet another wonderful day. Today I'm sharing two new cards I created using foamiran flowers. I have used the Blazing Poppy flower dies from Heartfelt Creations for both the cards.
This is a slim-line card measuring 9x4.5" in size with cream card base. Added few layers of pattern paper (DressMyCraft Magnolias collection) and cream cardstock on top of each other with just 1/4th of an inch larger from each layer.
The focal element of this card is the sentiment were I die-cut few pieces of "HAPPY" die and stacked them together, along with a piece of 'Birthday' word stamped with black ink. I also added a dragon fly die-cut element along with the flower arrangements on the bottom of the card. Finally added some clear water droplets of various sizes randomly over the completed card.


The next card here is measuring 6x8" in size with cream card base. 
Here I used the pattern papers from DressMyCraft - Pink Smoke collection, for the layering mats.
I created a 5x5" size shadow box with cream cardstock and used papers from the same pattern paper for the center and the frame of the box and adhered it to the center of the card base.
I have used some die cuts and chipboards on the inside as well as on the rim of the frames and then adhered the flowers and leaves as shown in the above picture. I used some sentiments to go along the top corner and inside of the shadow box, completed the card by adding few clear water droplets and flat back pearls.
Please do follow my page for more inspirations and do like and comment, for I would love to know your feedback.. thankyou.
 

Heartfelt Creations DT - Snowflake Greetings

 Hello and welcome to another inspiration day... today I'm sharing another beautiful creation using the Star Holiday Collection from Hea...